

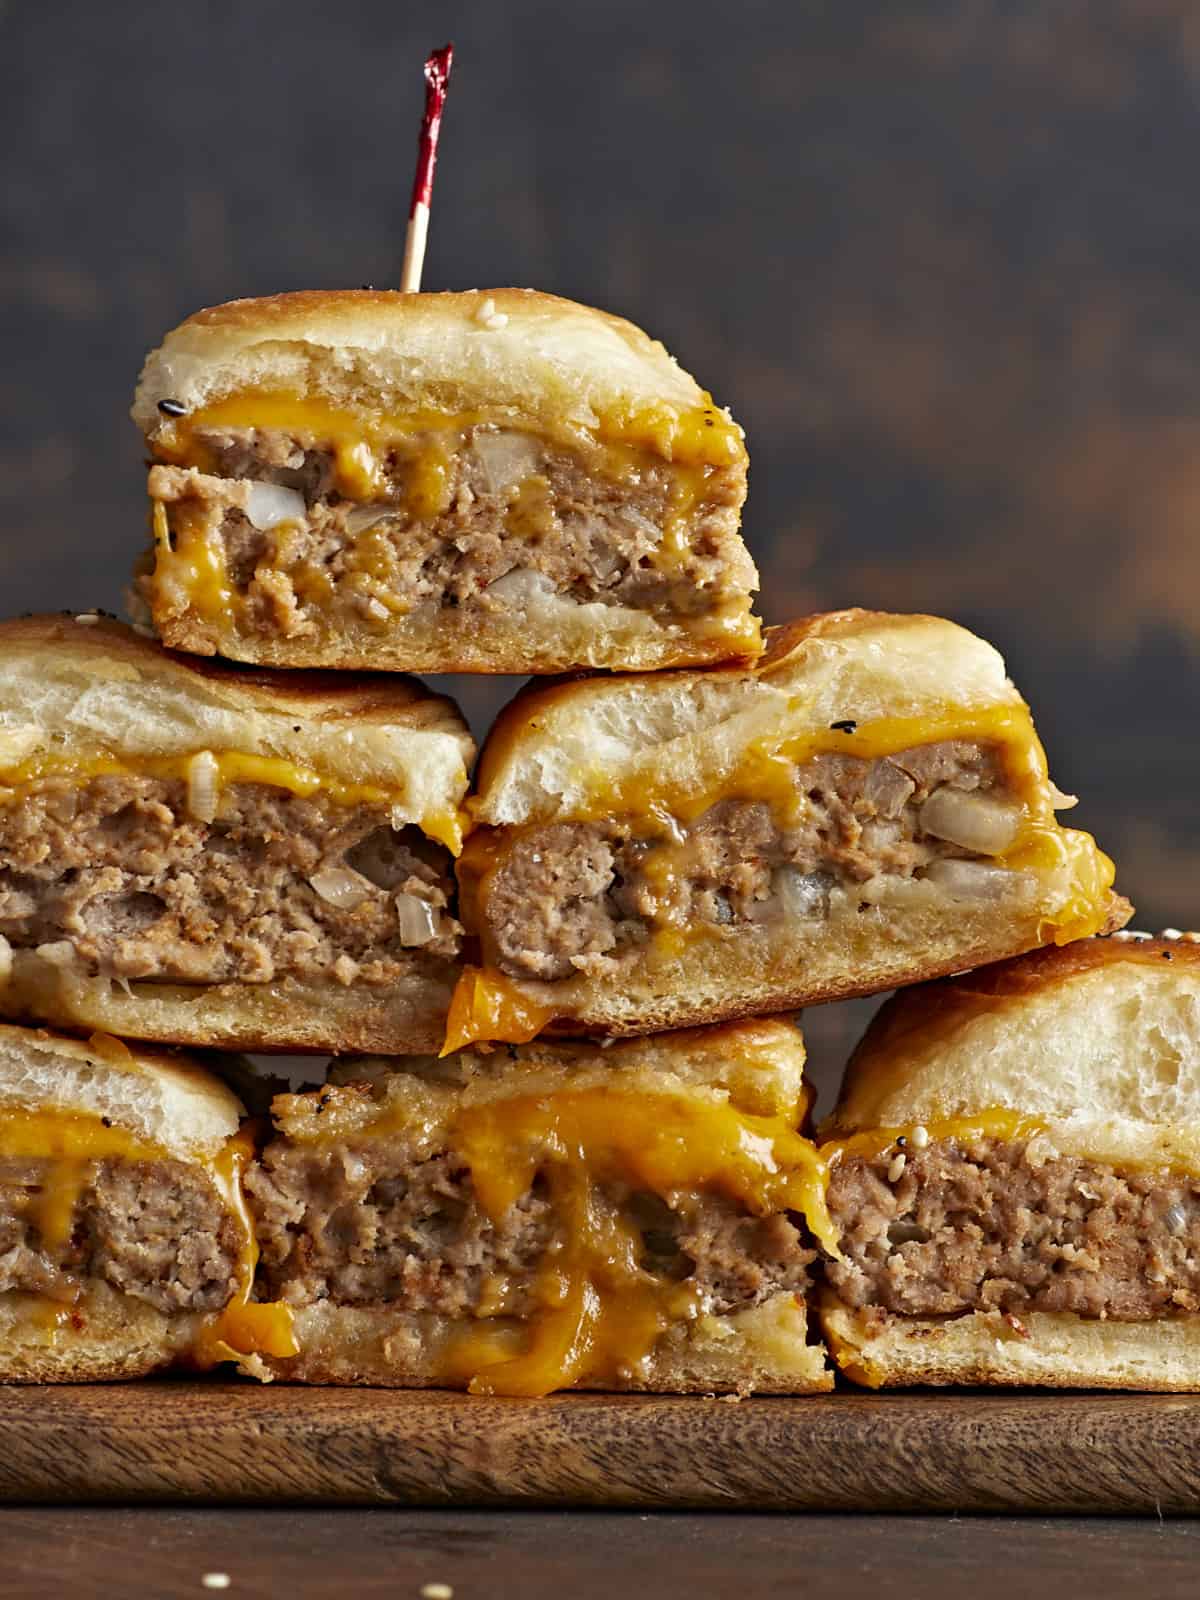
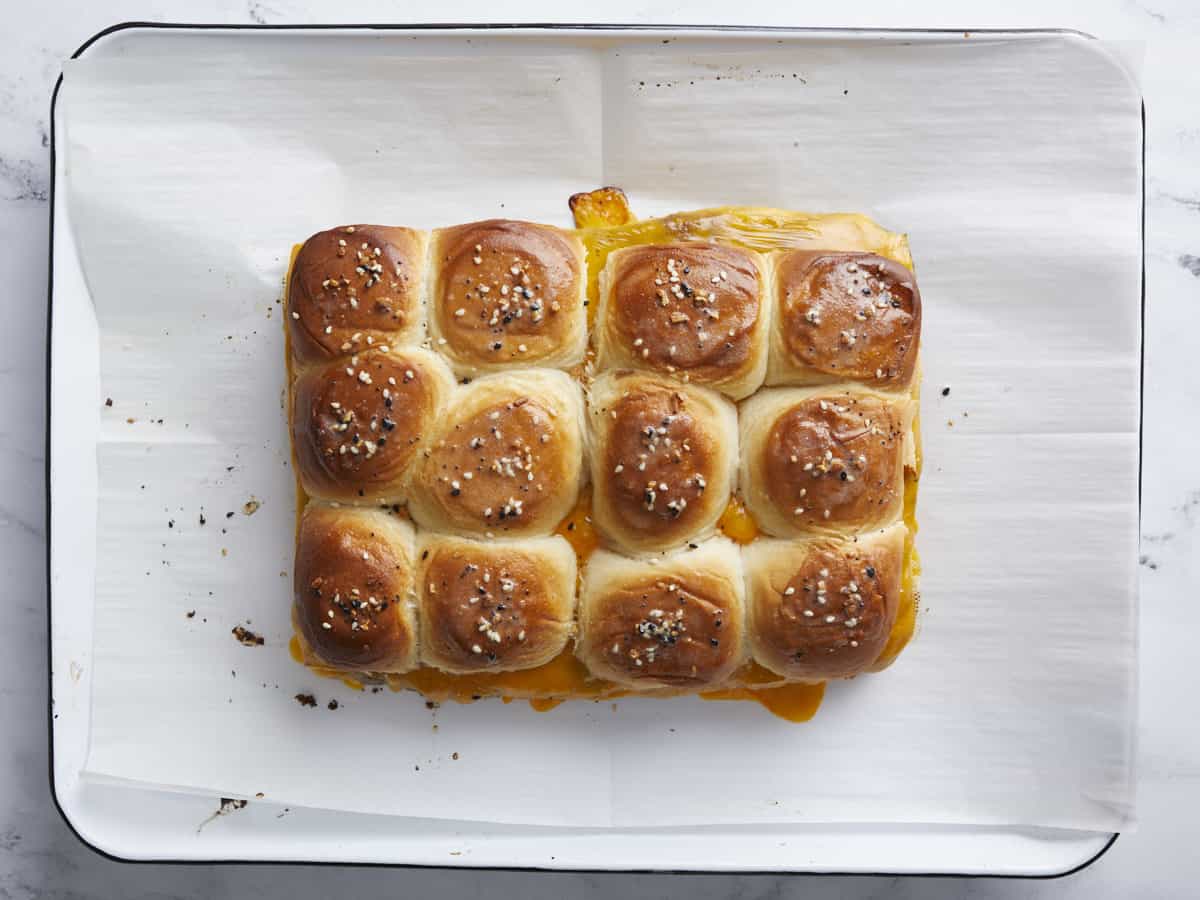
These super-tasty, mouthwatering Sliders feature savory beef and pork patties tucked into pillowy Hawaiian rolls dripping with American cheese. They’re a fabulous way to feed a crowd without much fuss because they come together quickly and are made by the dozen. That’s why this easy Slider recipe is my go-to for parties, potlucks, tailgates, the Superbowl, or a quick weeknight meal. Make it once, and I promise it’ll become the same for you!
All recipes are rigorously tested in our Nashville Test Kitchen to ensure they are easy, affordable, and delicious.
“This recipe is great! It was easy and very hands off for most of the cook which I appreciate!”
Sullivan
Easy Sliders Recipe
There are many ways to make sliders, but the basic ingredients are the same: ground meat, bread, onion, cheese, and toppings. You can get creative with your toppings, but I’ve kept things really simple here. In this recipe, I mix raw onions in the meat and bake one giant patty. I then sandwich the patty between uncut sheets of Hawaiian rolls with loads of cheese, bake it again until the cheese melts, and then cut it into a dozen sliders. Easy!
Sliders

Ingredients
- 1 white onion, diced small* ($0.70)
- 1 lb. ground beef ($4.98)
- 1 lb. ground pork** ($3.12)
- 1 Tbsp burger seasoning ($0.30)
- 1/2 tsp salt ($0.03)
- 6 slices American cheese (or your preferred melting cheese) ($0.93)
- 12 Hawaiian sweet rolls*** ($4.48)
- 4 Tbsp butter, melted ($0.50)
- 2 tsp everything bagel seasoning ($0.20)
Instructions
- Set an oven rack in the center of your oven and preheat it to 375°F. Line a sheet pan with a sheet pan rack. Add the ground beef and pork to a bowl. Sprinkle with onions, salt, and burger seasoning, and lightly mix.
- Add a sheet of parchment paper to your work surface. Press the meat onto the parchment paper and shape it into an 8×12-inch rectangle. Place the parchment paper with the meat on it on the sheet pan rack.
- Top the meat with another sheet of parchment paper, then place a second sheet pan on top of it. Bake for 20 minutes or until the internal temperature of the meat reaches 150°F.
- In the meantime, slice the rolls in half lengthwise. Brush the rolls with 2 tablespoons of butter.
- Once the 20 minutes are up and the meat has reached an internal temperature of 150°F, remove the top sheet pan from the oven. Then remove the sheet pan that has the meat in it from the oven. Remove the top layer of parchment paper to reveal a large meat patty.
- Use two large spatulas to remove the meat from the parchment paper on the sheet pan rack. Top the bottom rolls with the large meat patty.
- Add the 6 slices of American cheese in a single layer.
- Place the top rolls on top of the meat and cheese. Brush the tops with the last 2 tablespoons of butter. Sprinkle with 2 teaspoons of Everything But The Bagel Seasoning.
- Cook for 15 minutes or until the bread toasts and the cheese melts. Remove from the oven and cool for a few minutes before slicing into individual sliders. Serve on a platter and enjoy your the oohs and ahhs at your get-together!
See how we calculate recipe costs here.
Notes
- Burger seasoning is a blend of simple spices like paprika, onion powder, and garlic powder. It adds a add deep flavor to the meat which I love. We’ve got a great Homemade Burger Seasoning recipe, but your favorite seasoning blend will also work here. You can also just use up to a teaspoon of salt and a few cracks of black pepper.
- As for the Everything Bagel Seasoning, you can substitute it with sesame seeds, poppy seeds, or flaky salt. The Everything Bagel Seasoning can also be omitted if desired.
Nutrition
How to Make Sliders Step-by-Step Photos
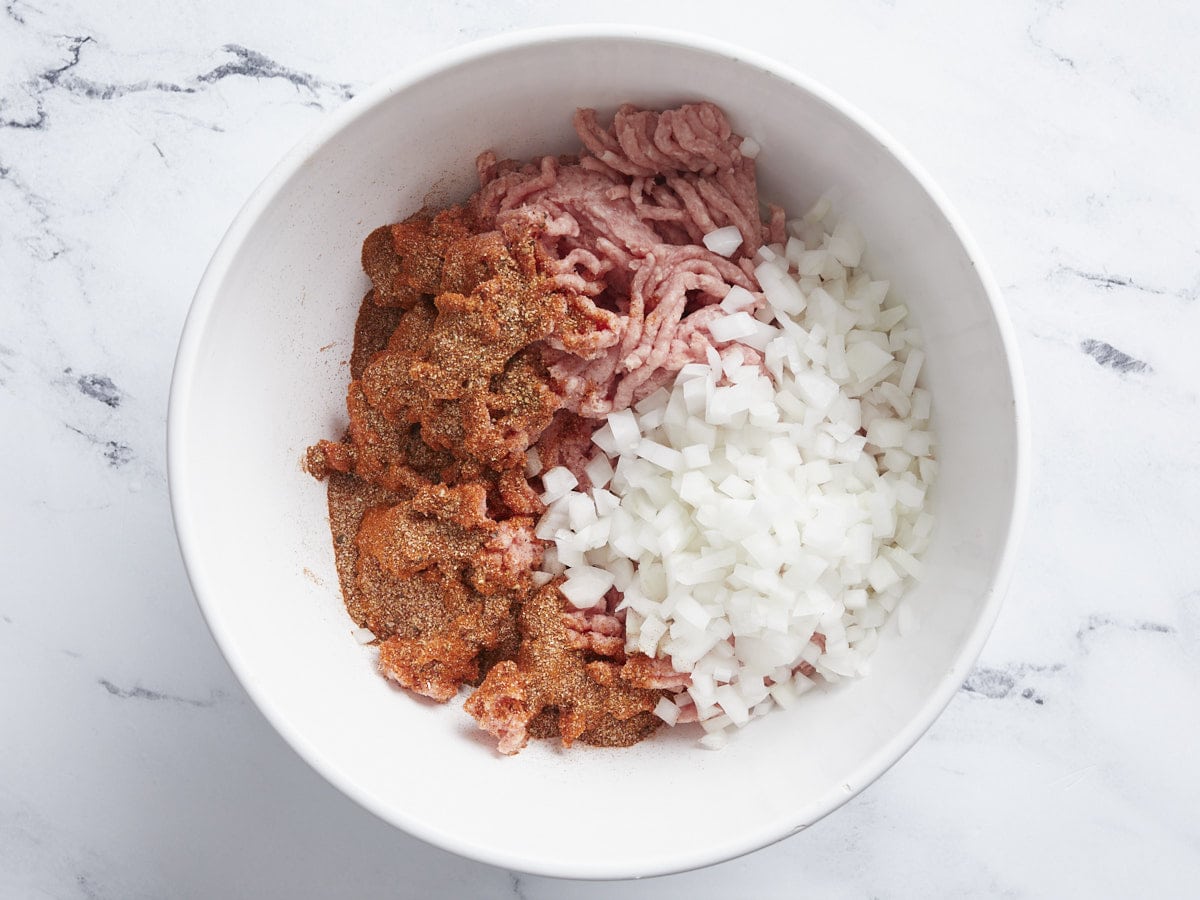
Make the meat patty: Set an oven rack in the center of your oven and preheat it to 375°F. Line a sheet pan with a sheet pan rack. Add 1 lb. ground beef and 1 lb. ground pork to a bowl. Sprinkle with 1 diced white onion, 1/2 tsp salt, and 1 Tbsp burger seasoning, and lightly mix.
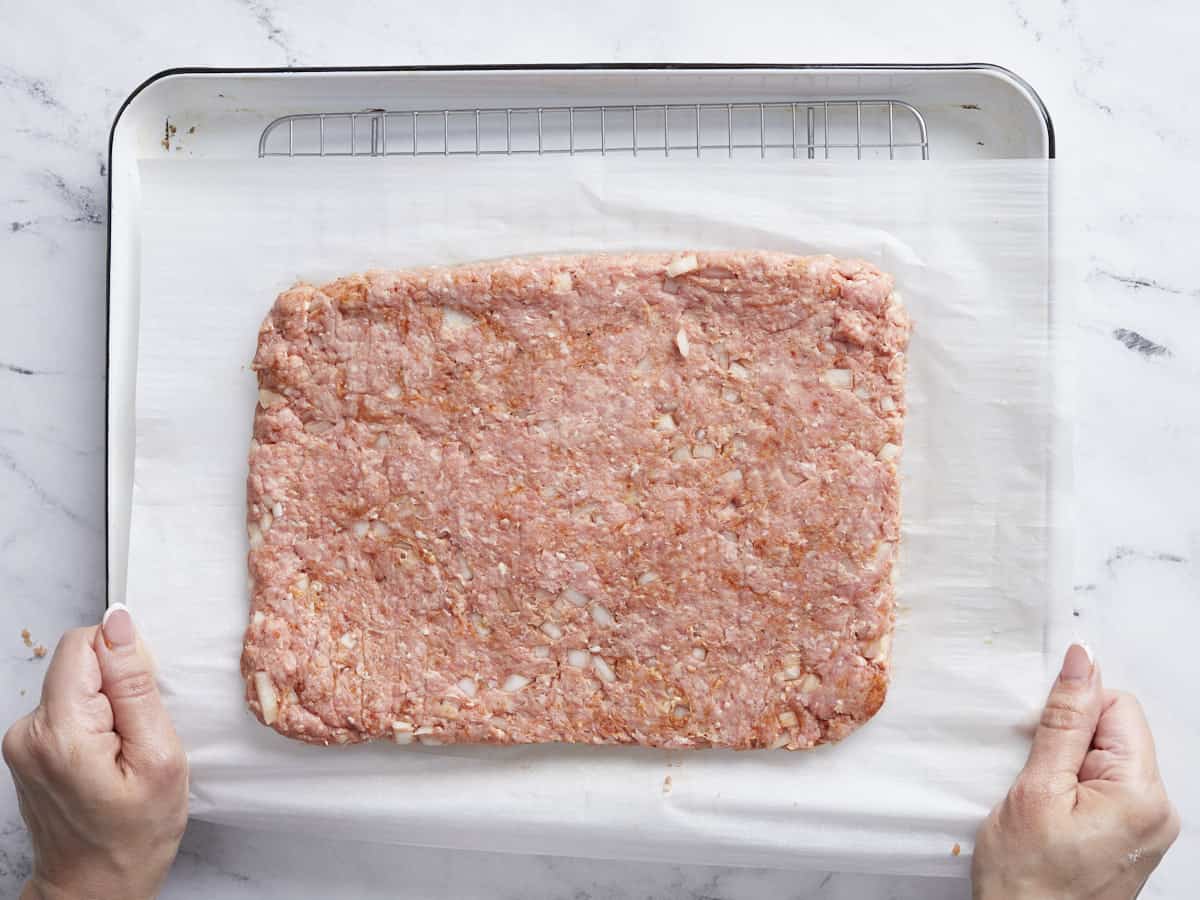
Add a sheet of parchment paper to your work surface. Press the meat onto the parchment paper and shape it into an 8×12-inch rectangle. Place the parchment paper with the meat on it on the sheet pan rack.
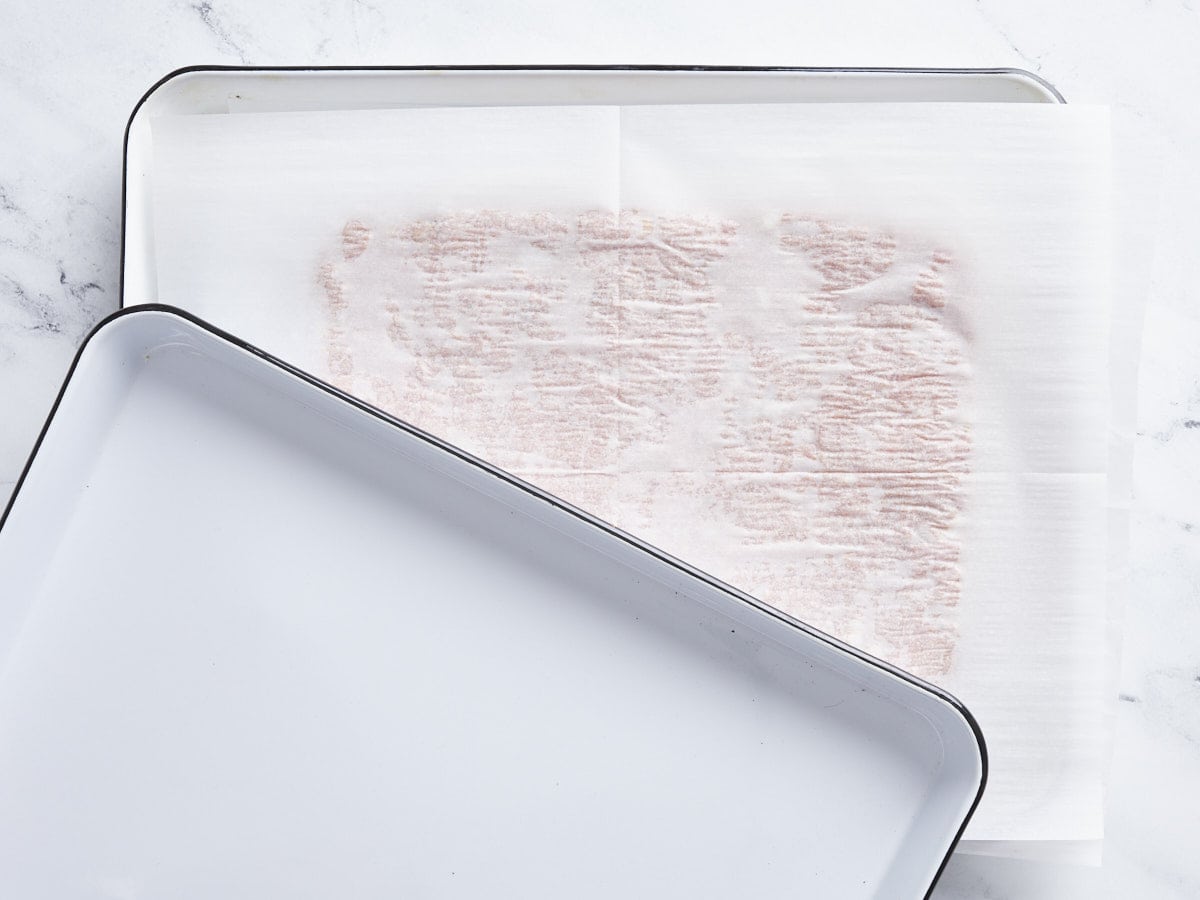
Cook the meat: Top the meat with another sheet of parchment paper, then place a second sheet pan on top of it. Bake for 20 minutes or until the internal temperature of the meat reaches 150°F.
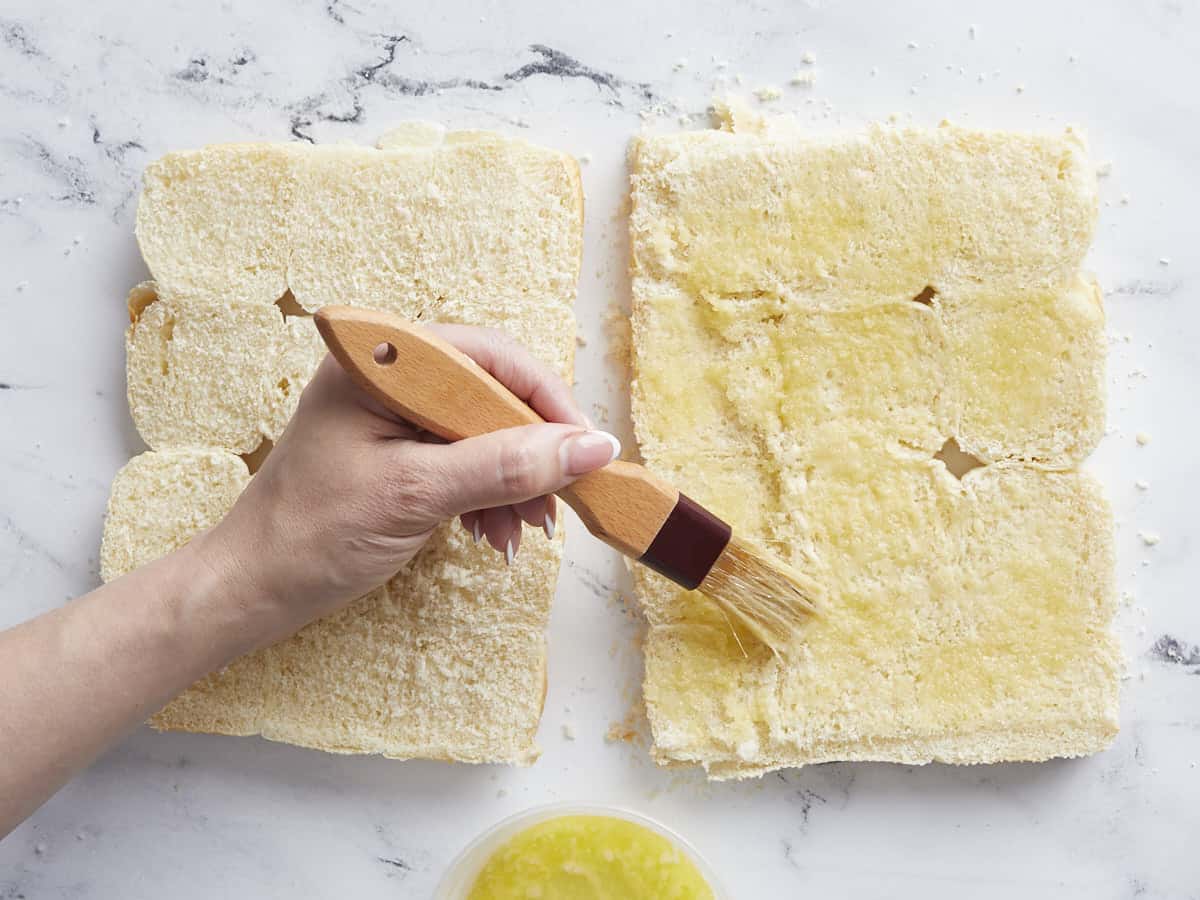
Prep the rolls: In the meantime, slice one sheet of 12 sweet Hawaiian rolls in half lengthwise. Brush the rolls with 2 tablespoons of butter.
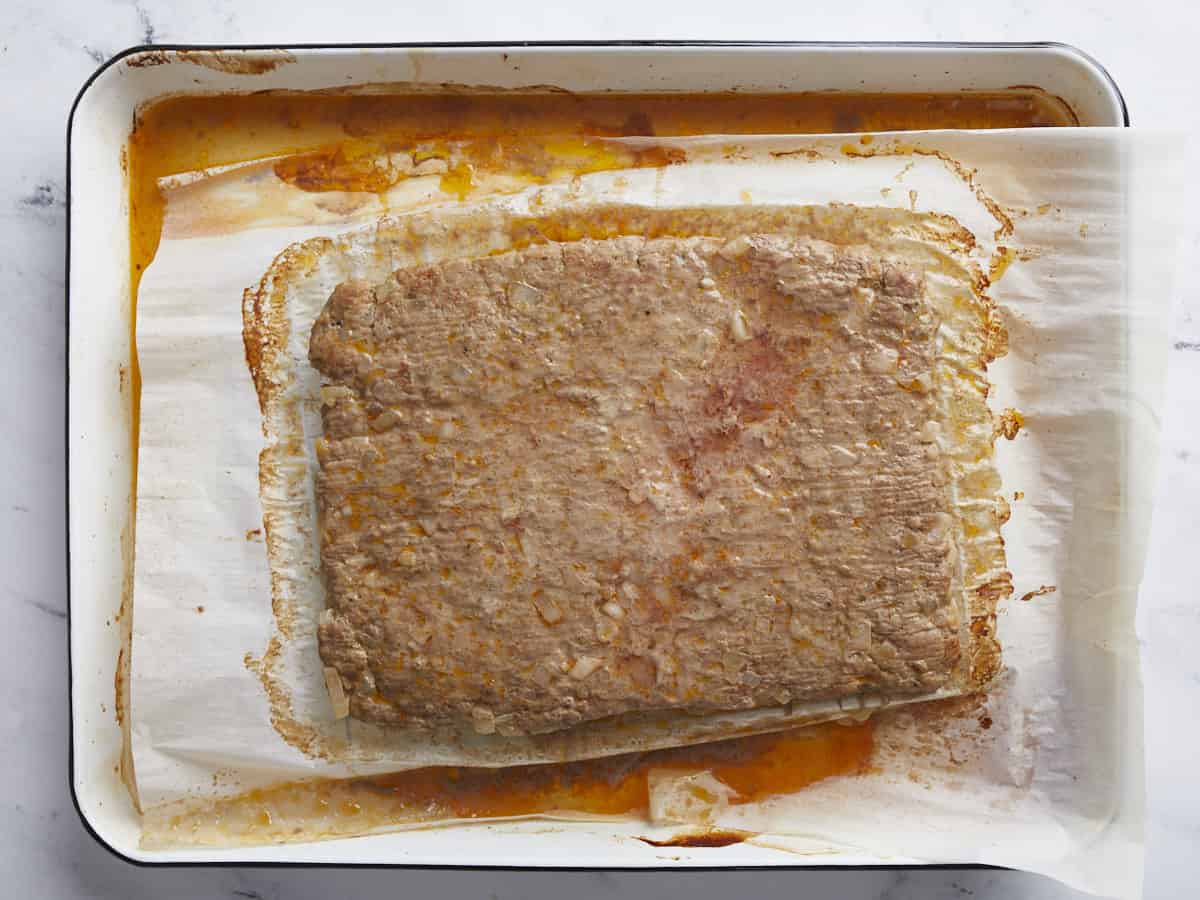
Assemble the rolls: Once the 20 minutes are up and the meat has reached an internal temperature of 150°F, remove the top sheet pan from the oven. Then remove the sheet pan that has the meat in it from the oven. Remove the top layer of parchment paper to reveal a large meat patty.
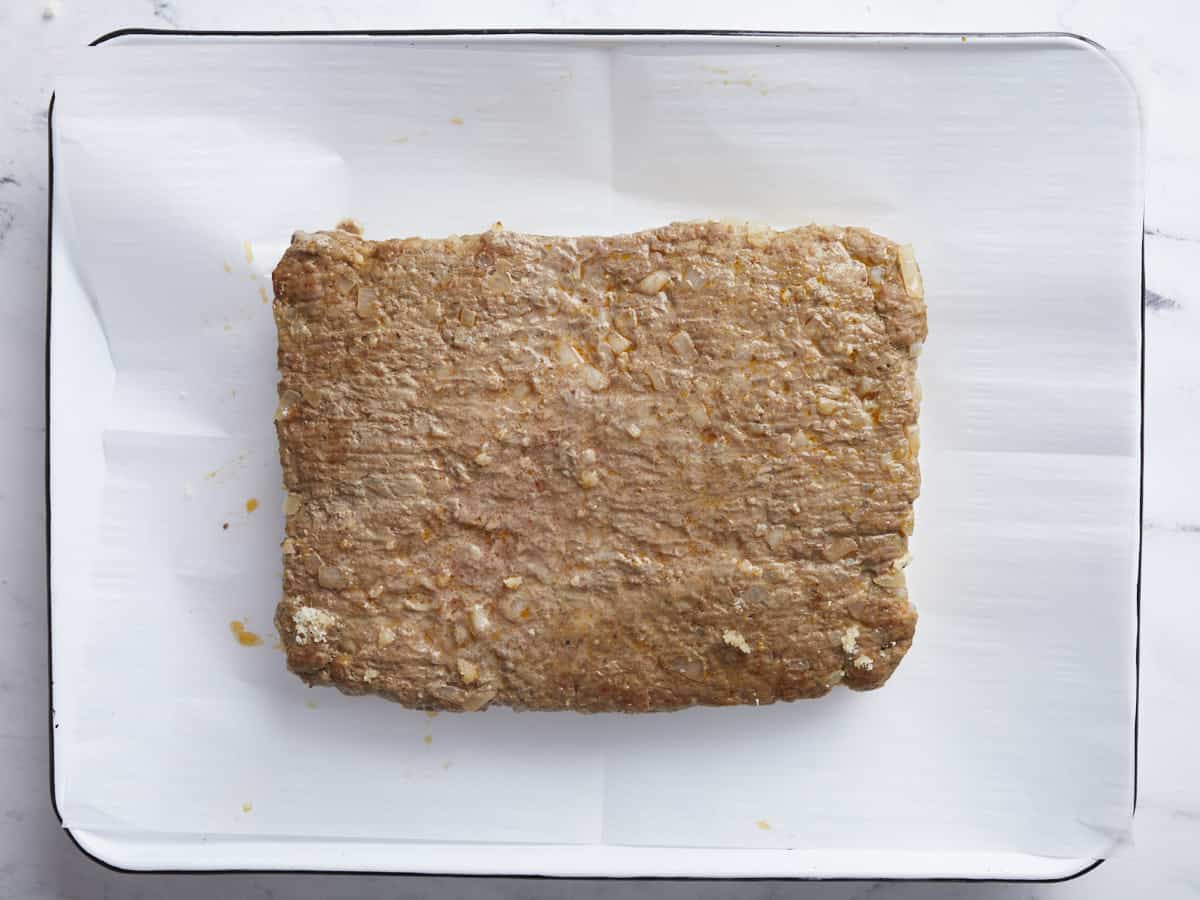
Use two large spatulas to remove the meat from the parchment paper on the sheet pan rack. Top the bottom rolls with the large meat patty.
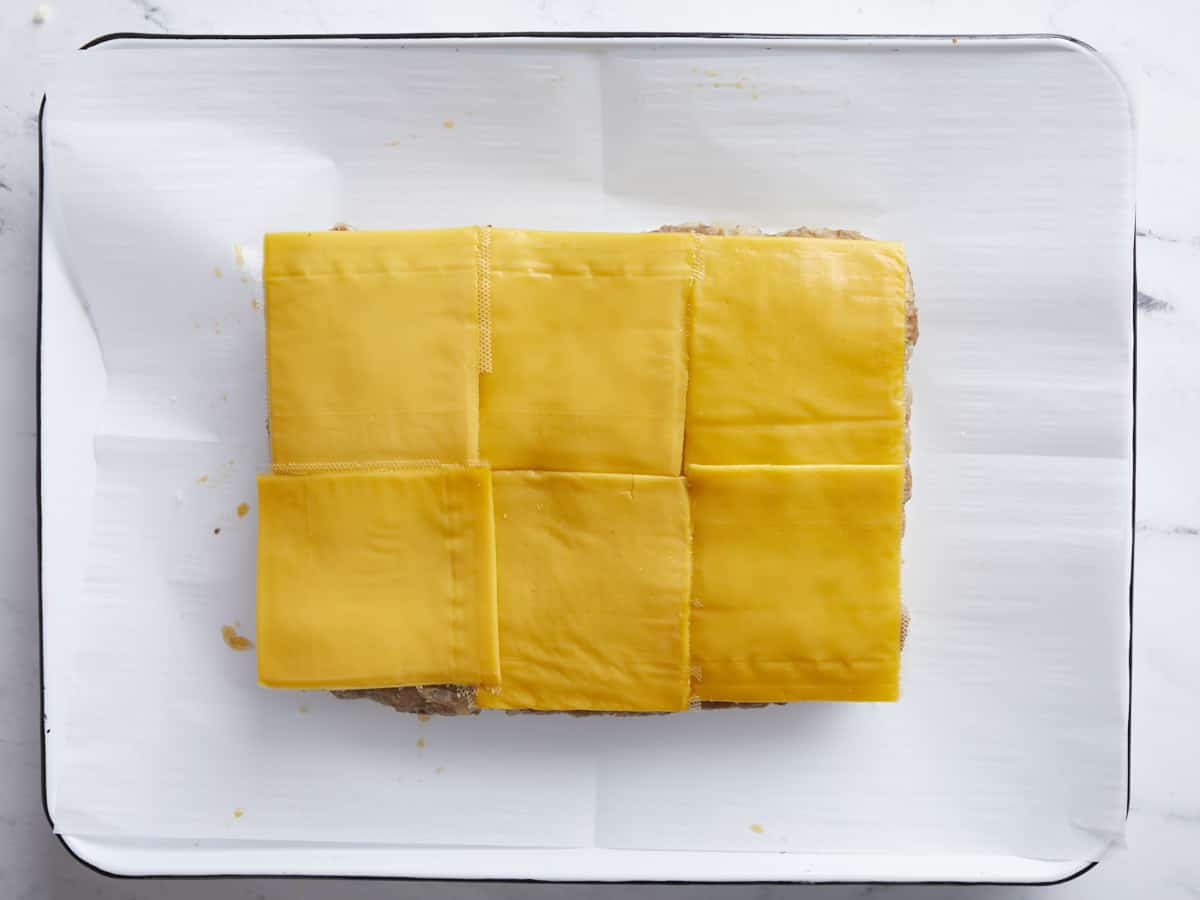
Add the 6 slices of American cheese in a single layer.

Place the top rolls on top of the meat and cheese. Brush the tops with the last 2 tablespoons of butter. Sprinkle with 2 teaspoons of Everything But The Bagel Seasoning.
Bake the sliders: Cook for 15 minutes or until the bread toasts and the cheese melts. Remove from the oven and cool for a few minutes before slicing into individual sliders. Serve on a platter and enjoy the oohs and ahhs at your get-together!

Recipe Tips!
- Dice the onions small. Avoid overly large pieces of onion in your meat mixture; otherwise, the patty might fall apart during cooking. I recommend dicing them small, as you can see in my step-by-step photos above.
- The meat will shrink a bit in the oven. Keep in mind the size of the meat patty will likely shrink during cooking. I measure my patty out to be an 8×12-inch rectangle. After shrinking some in the oven, it was the perfect size for my Hawaiian rolls (King’s Hawaiian rolls). Keep in mind different brands of rolls might have different dimensions, so be sure to adjust accordingly.
- Avoid overmixing your meat! Doing this can make the patties tough and dense. Just mix until the ingredients are evenly distributed.
- Don’t have a wire rack? I place a wire rack over a baking sheet, then place a piece of parchment paper over the top (which stops the meat from sticking to the rack), to allow the meat juices to drip off the parchment paper and onto the baking sheet rather than pool around the patty. If you don’t have a wire rack, that’s ok! Just be sure to blot the meat before placing it on the buns to stop them from getting soggy.
What To Serve With Sliders
You can’t go wrong pairing sliders with anything potato-based like French fries or air fryer sweet potato fries. I also think they’re great served with coleslaw and baked beans, or, for the ultimate indulgence, nacho cheese dip. (Don’t knock a nacho cheese-dipped Slider until you’ve tried it!)
How To Store Sliders
If you have leftovers, remove the patty from the bun and refrigerate the bread and meat in separate air-tight containers. When ready to eat, reheat in individual sheet pans in a 350°F oven. Warm the bread for a few minutes and pull the patties when they start to steam. Then assemble.


Eay enough to prep, but cook time is not long enough. Only used 1 pound of meat and they were a soggy mess after 35 minutes of cook time. Hoping they are salvageable.
This was really similar to a recipe I had made on the Tasty.co site so I referenced some things from there. I didn’t do the parchment paper or measuring, I just pressed the meat into a 9×13 and made sure it was slightly larger than the rolls for shrinkage. When it was done, I just wiped up the extra grease on the meat and pan with paper towels before assembling the sliders.
The only reason I give 4 stars is because my sliders were THICC. I got the Aldi brand Hawaiian rolls that were 12 each to a package, and the meat patty was way too much. I would use 8 oz each next time to total 1 lb, not 2.
This recipe is great! It was easy and very hands off for most of the cook which I appreciate!
I did not put a pan on top as I misread the instructions and it took almost twice as long to cook the meat, so I am attributing that to user error.
A cool hack for shaping the meat is to put it into the white cardboard tray that the hawaiian rolls come in, it will be the same size as the buns while its raw, but do be warned, it will shrink a bit in the oven. The shrinkage was okay for me because I would rather just press the meat into the cardboard form than deal with some measurements.
The directions for this recipe make no sense. I tried reading and re-reading them while making this and it was so confusing. Why use a wire rack if you are going to put parchment paper on top of it? The meat juices just went everywhere, all over my oven. Then what are you supposed to do, remove the wire rack and put a new sheet of parchment paper with the rolls on it? Or put the rolls on the wire rack?
Recipes from this site are usually a winner but sorry, I couldn’t make heads or tails of this one. I had to guess at it to try and make the finished product work which was annoying and took a long time.
My patty separated a lot in the oven. Any suggestions?
Hmm, it’s hard to say without seeing it in person, but perhaps the onion pieces were too big and preventing the meat from baking together solidly?
The measurements are confusing to me because it looks like the patty is supposed to be the same size as the block of rolls, and the rolls are about 6.5×8.5. Is the meat supposed to contract while cooking?
The meat does contract a little while cooking (you can see down in the step by step photo where the meat left a mark on the parchment after it was cooked). It’s also possible that your rolls might be a different size than what we used?
Use a box grater for those onions! It works so much better than mincing them
RIP to anyone’s eyeballs that tries this
place a wet paper towel next to you when grating onions….no tears! :)
What if you don’t have a sheet pan rack? Can you’d till make this?
The rack helps the meat stay up out of the juices, but if you don’t have one you can still make it, you may just want to blot the bottom of the meat a little before placing it on the buns so they don’t get soggy. :)
Great recipe! I think the measurement of the meat rectangle is wrong though. I used a 12×16 baking sheet but only about a 10×8 or so meat rectangle. If I did 12×16 it would have been the whole sheet and a lot of meat hanging off the edge.
Thanks for catching that, Bob. I re-measured and it’s definitely 8×12-inch. It looks like Monti may have measured wrong. The recipe has been updated to reflect.
I usually love recipes from this site and trust that they’re going to be good but this just wasn’t it. I made it hoping it would be easier than regular burgers, but it ended up being just as much work, if not more. And the way the meat cooks and just steams itself leaves it tasting more like sad meatloaf than a hamburger slider.
Can you sub ground turkey for the ground pork?
Ground turkey has a less fat than ground pork, so it will definitely change both the flavor and texture of the sliders.
How would you keep warm if serving at a potluck? Or do you?
If you have a chaffing dish, that would probably be the only method for keeping them warm. If you don’t, just make sure they’re not sitting out at room temperature for more than two hours.